
Loosen Up Your Painting: Introduction
Loosen up your painting! One of the most common questions I get is ‘how can I loosen up my style?’
Fair question. Is it a matter of how you hold your brush? A technique? Or, is it just a style that some people have and some don’t?
When I started learning watercolour painting, I was in awe of how my favourite artists could take any old reference photo, no matter how complex, and whip up a beautifully expressive painting in just over an hour. I would slave away on the same painting for hours, making it look overworked and dull.
In this article, I’m going to share a few practical tips to help you loosen up and capture the essence of a landscape scene.
Loosen Up Your Painting: Tips
Tip 1: Adjusting Expecations
So, let’s think about our expectations first. Painting loosely, while creating a strong composition and elements of realism isn’t about painting quickly with abandon. In fact, it requires careful planning and timing in order to make sure all the elements merge or separate accordingly.
It takes many years of practice, often refining your process and finding a ‘sweet spot’ between accuracy and looseness. You have to know how the paper will react when fully wet, half wet, damp, what areas to darken, focus on, what not to. As you gain confidence and experience, it becomes easier to see a path from start to finish, and how you can get there more efficiently.

Tip 2: Planning Out Your Painting
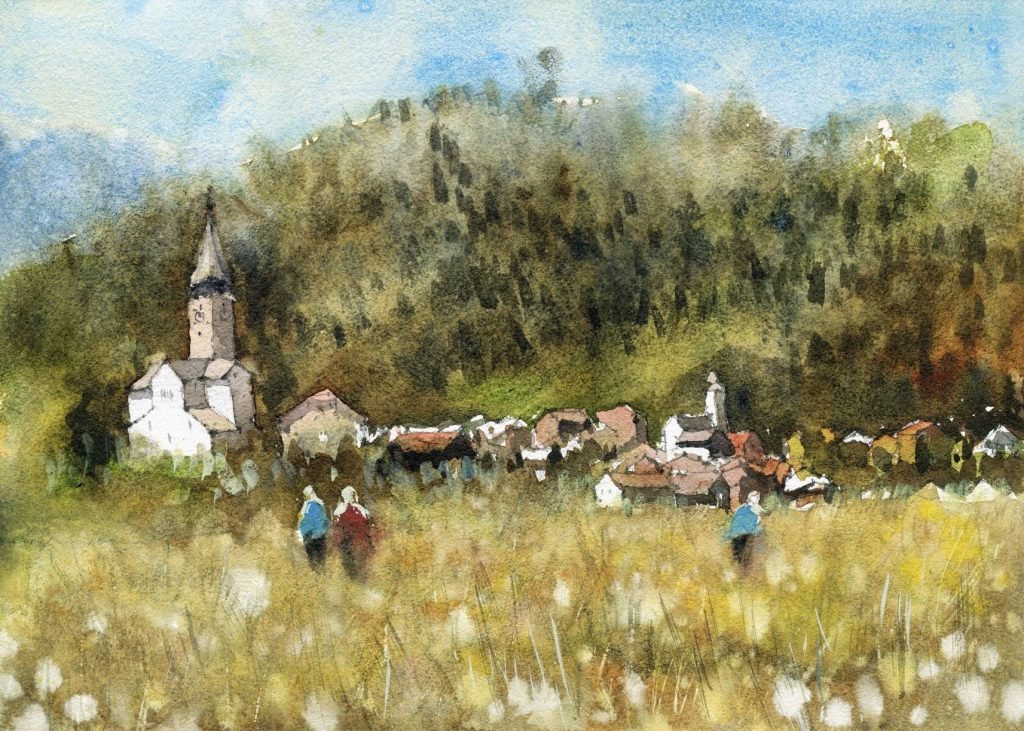
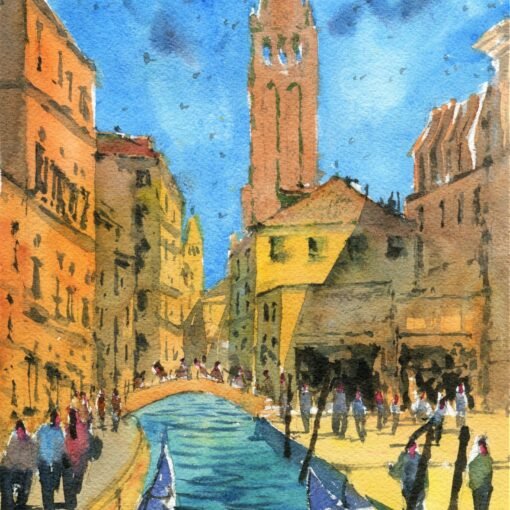
Take for example the scene here with the church/town in the background, and grass/flowers in the foreground. I had to plan ahead and paint most of the ‘soft’ bits first. These include mainly the foreground and background mountains/trees and sky.
I used a thin wash of sap green/undersea green first, in order to cut around the buildings. I then dropped in darker greens, blues in order to create a sharp edge around the buildings. This took a relatively short amount of time, as I already knew the exact tones and colours I’d be using. I also knew the accuracy tolerance I would need in order to preserve the shape of the buildings.
You’re always sacrificing some accuracy when you paint faster, but you do it right, you will also gain freshness and expressiveness.
Remember, painting is a process and it starts before you lift up your brush. Planning and rehearsing each step mentally will allow you to focus on the bigger picture so that you can create confident and efficient brush strokes.
Tip 3: Start With A Simple Drawing
Think about the focal point(s) of your painting. You may want to draw extra attention to specific contrasts or details like buildings, people, cars. With most landscapes, you don’t need to draw much at all. Just a horizon line, trees, rocks, landmarks, a figure, maybe a building. I try to get most of the detail in through my brushwork. If there is a shape or landmark that MUST be recognisable, just spend a bit more time drawing it so there’s a good blueprint for your painting.
Adding too much detail to your drawing can limit expression in your painting. You may feel restrained by the drawing, especially if you’ve put in an hour or more meticulously adding in all the details.
A good drawing is like a good plan. It saves you time and allows you to shift your attention towards your painting and what you are doing with your brush at the moment. This way, you’re focusing on one thing at a time.

Tip 4: Only Paint With Two Layers
Okay, so technically it’s three but the last ‘layer’ is just finishing touches. Look at your reference and decide what parts at the lightest and darkest areas. Look at which bits fall in between. You’re basically scanning the photo for tones. You can then paint all the light areas in first, then add the darks afterwards.
I add my darks in using both wet-in-wet techniques. That allows some soft blending to occur which creates interesting variations of tones and colours. I also use wet-in-dry techniques with my darks to create extra sharpness.
By using fewer layers, you finish your painting faster, and you are forced to find ways to paint large areas more efficiently. That may mean merging some dark and lighter areas or reducing a subject down to FEWER tones.
Once your two layers are in, see if you can add in some light highlights with gouache or perhaps add in a little extra darkness in areas to make everything else pop.
Tip 5: Work On Your Techniques
Wet-in-wet is one of the most fun and incredible techniques to play with – made possible only in watercolour. I believe wet-in-wet is a crucial part of creating a loose painting. But why is that?
Often I hear people say ‘let it dry first! you’ll stuff it up!’
It’s a common fear we all have – losing control of the subject and having it all blend into a big mess.
One thing you have to remember is that there are parts of a painting that you can allow to blend and other parts that you should leave as a sharp edge. Let me explain.
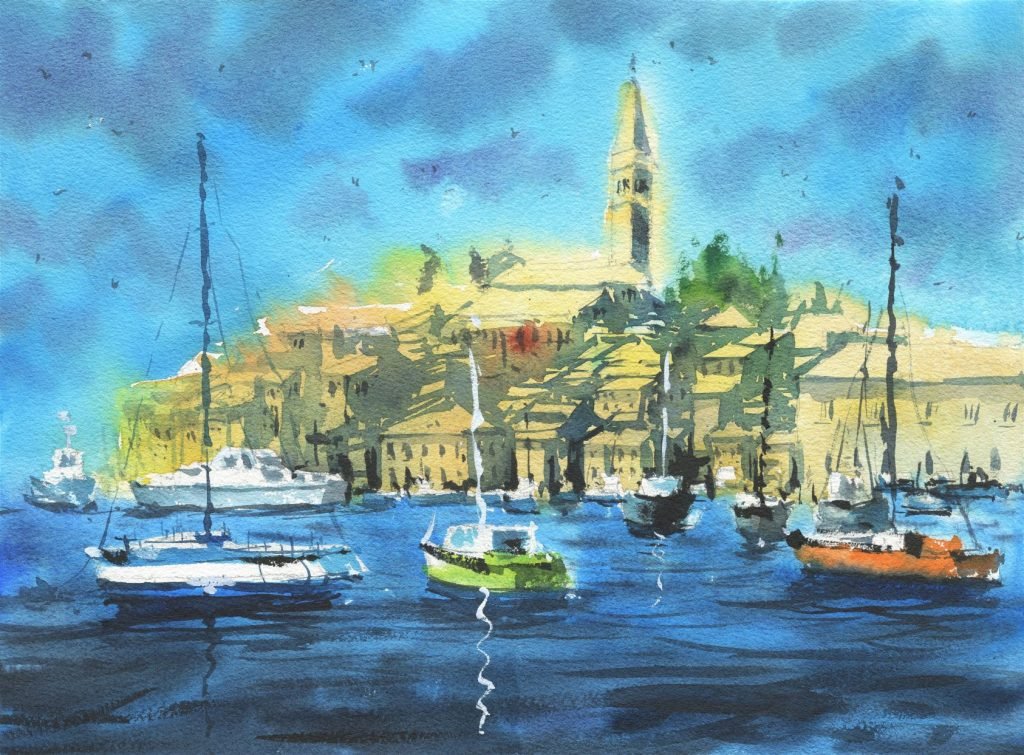
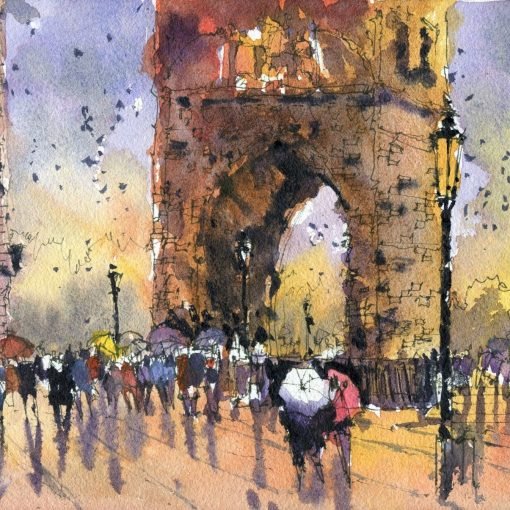
In the painting here with the boats and bright buildings in the background, I’ve allowed the sky and the warmth of the buildings to blend. I let the light yellow wash on the buildings dry slightly to avoid the sky wash completely spreading downwards into the buildings. Also, notice how I extend the yellow slightly further than the edge of the buildings? This creates soft edges and allows me to paint a large area efficiently. The clouds and soft waves in the water were also added wet in wet. It all happens very quickly but you have to know when to do it.
Mind your brush!
With broad areas such as the sky, mountains, water, grass, try to use the largest brush that you can. Pick one that holds a lot of water, but has a sharp point, allowing you to cut around smaller details such as buildings or boats.
If you want that ‘alla prima’ look, use as few brush strokes as possible to paint something. This applies when painting a large wash such as the sky, or something smaller such as a boat or figure. The allure of a loose painting is that there is a balance between elements and not excessive detail in one area. It all comes together as one.
Also, try to paint sharp edges with broken lines. Lines that are painted too carefully or at the same width can make a painting appear rigid, without life. Adding too much sharpness can be distracting and it can look out of place in a loose painting. Try to preserve the general forms that you see. Once it starts looking like what you want it to be, then leave it and work on another area. You can always come back to it later.
Loosen Up Your Painting: Final Words and Resources
You can loosen up your painting! If you want to learn more through a practical workshop, have a look at the playlist below or click here.